Introduction:
This guide explains using JavaScript (JS) objects in EasyBuilder Pro to download text from an ASCII object and save it to a text file in the USB1 folder. We will also cover how to set up a logger so print statements can be made directly on to JS objects.
Warning
JS objects provide powerful customization features, but misusing them can result in system error or performance degradation. Please use JS objects carefully.
Software Version:
The JS Object is exclusive to cMT-X series HMIs
EasyBuilder Pro 6.05.01+
Related Tutorials:
How to transfer device data using the JS object
Video - Introduction to Weintek’s JS Object (JavaScript)
Video - How to draw shapes with Weintek’s JS Object (JavaScript)
JS Action/Object SDK Documentation
Instructions
-
Navigate to the Object tab and select JS Object under the JS-related options.
-
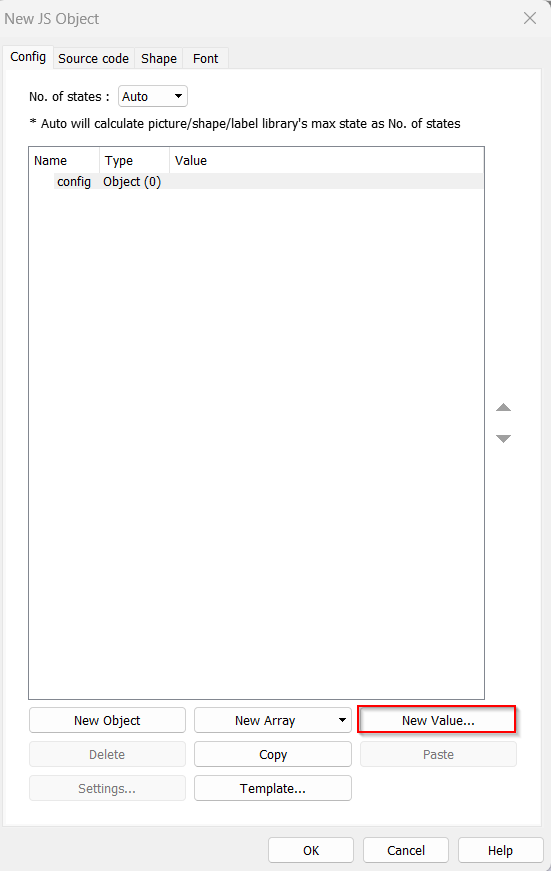
Within the Config tab, select the New Value button at the bottom of the page.
-
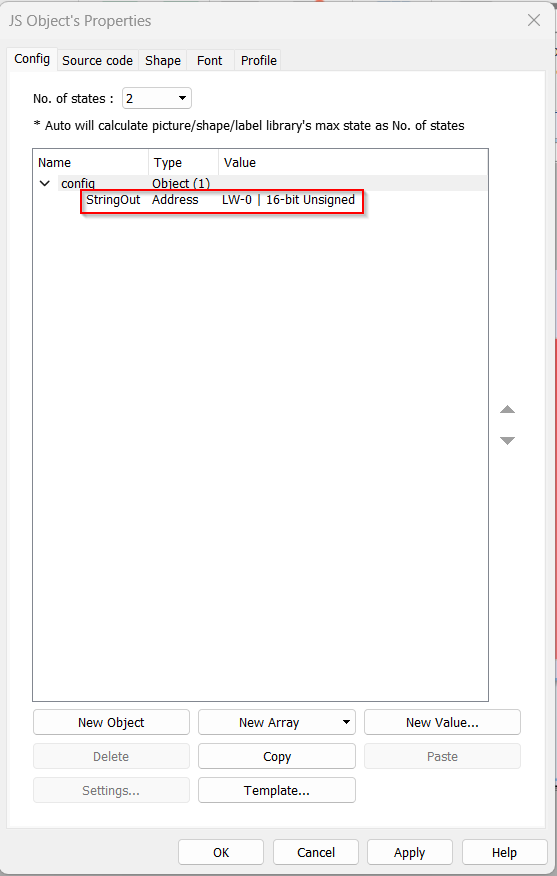
Set the Name attribute as desired; in this example, we will use “StringOut” for the name. Additionally, select Word for the Type attribute and set a memory address. For this example, we use address LW 0. We will use a 16-bit unsigned type, but you may modify this as needed. After making the changes, select OK.
-
Next, navigate to the Source Code tab. This section is where the JS code will be applied and compiled.
-
First, we need to initialize our variables.


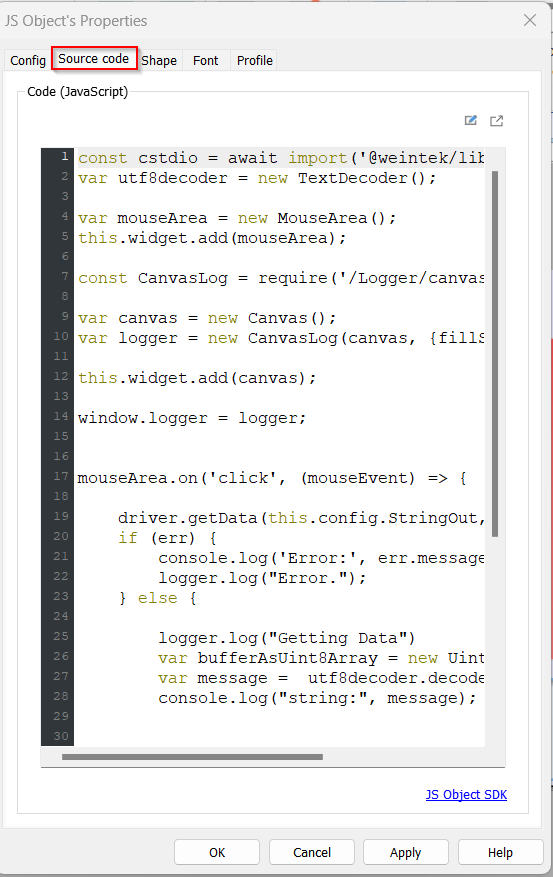
const cstdio = await import('@weintek/libc/stdio'); // Library needed to open file
var utf8decoder = new TextDecoder(); // Object to decode ASCII object text

var mouseArea = new MouseArea(); // On click object which will allow a function to run when the JS object is clicked on.
this.widget.add(mouseArea);
- Next, we will instantiate the on-click object, which will run the function when the JS object is clicked.
mouseArea.on('click', (mouseEvent) => { // Instantiate mouseArea object

// on click of object these functions will run

    });

});
- Within the mouseArea function, the text will be pulled from the ASCII object, decoded, and inserted into the specified file when clicked. An error catch is also implemented.
mouseArea.on('click', (mouseEvent) => {
driver.getData(this.config.StringOut, 11, (err, data) => { // gets data from ASCII object.
// this.config.StringOut == Variable set up in the config tab
// 11 = number of words that will transferred.
// (err,data) == error catching
if (err) {
console.log('Error:', err.message); // Error catch
} else {
// Set up a middle array to a temporary holding area for the text from ASCII object
var bufferAsUint8Array = new Uint8Array(data.buffer);
var message = utf8decoder.decode(bufferAsUint8Array)
console.log("string:", message); // Print the message to the console (Optional)
// Set up an encoder object which will insert text into the specified file.
const encoder = new TextEncoder();
// Open file. Modify as needed.
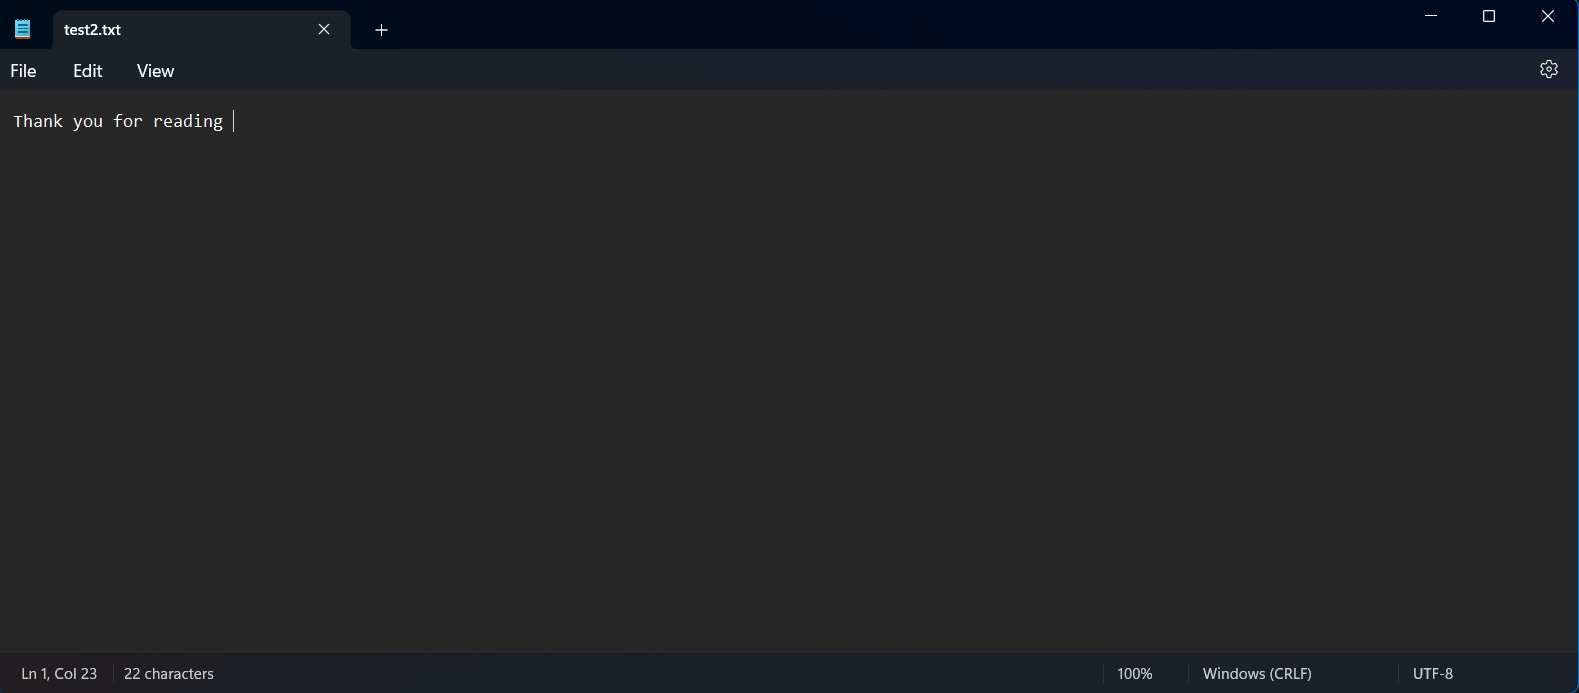
const file = cstdio.fopen('usb1', '/test2.txt', 'a+');
// 'usb1' == File selected in EasyBuilder Pro files to send text to
// '/test2.txt' == Created file within the usb1 folder that will receive the text
// 'a+' == Text will be appended to the file. This will keep a running count within the test2.txt file of all sent text.
cstdio.fwrite(file, encoder.encode(message).buffer);//message is written into the file
cstdio.fclose(file); // Close the file
}
});
});
-
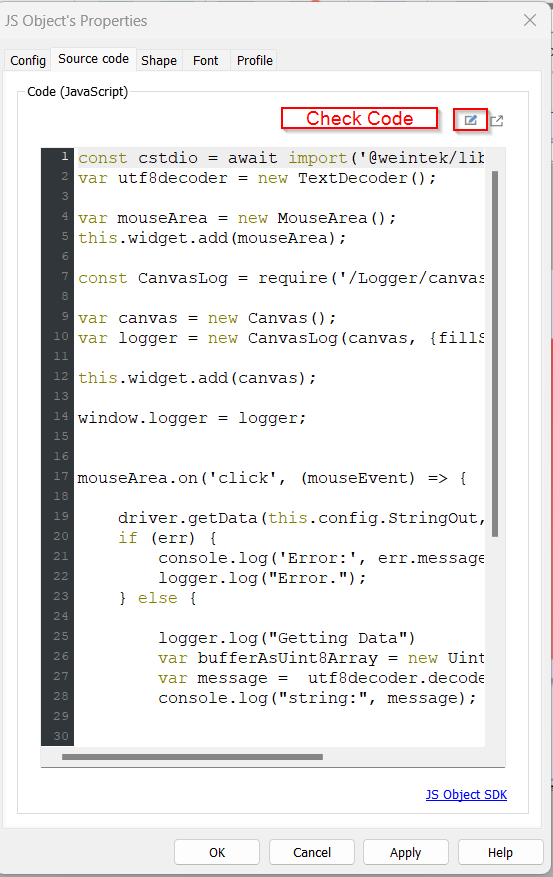
After implementing the code, click the Check Code button at the top right to check for any errors. If no errors are found, click Apply and OK to place the object in your project.
Note: For visual clarity, you can add a shape to your JS object in the Shape tab. -
Next, we will set up the ASCII object to write our messages into. Navigate to the Object tab and select ASCII.
-
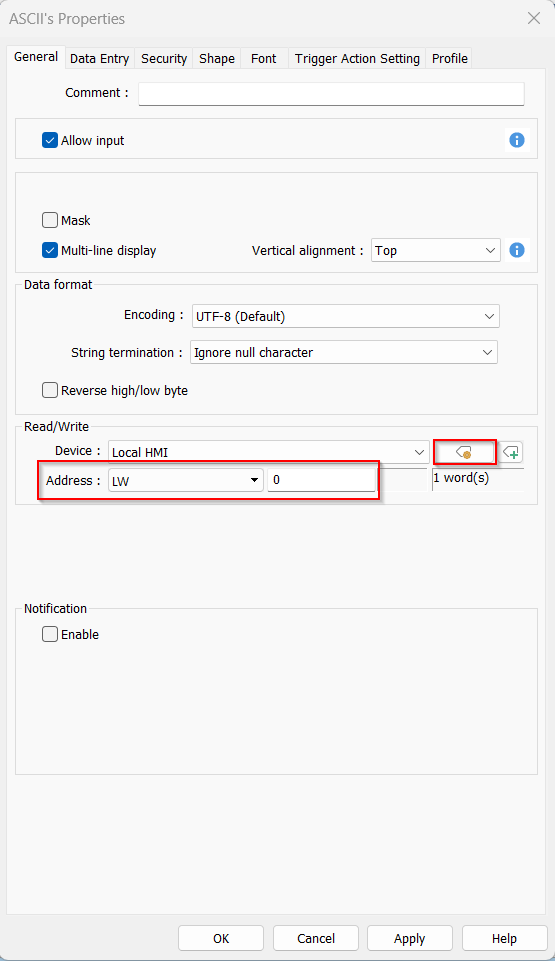
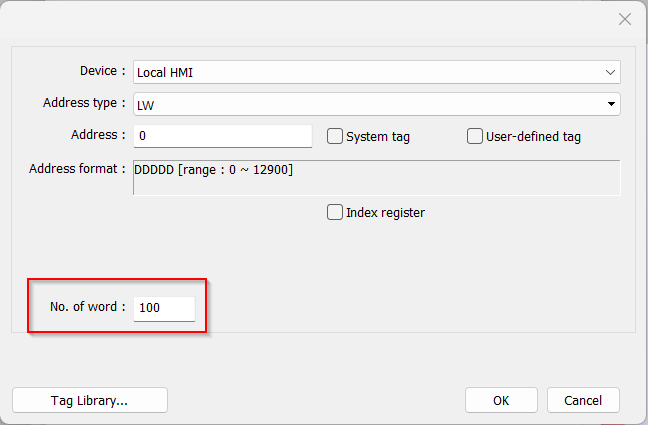
Ensure the Read/Write address in the ASCII object matches the JS object address. To allow for more words in the ASCII object, select the yellow tag button, which will enable you to modify the number of words entered into the ASCII object.
-
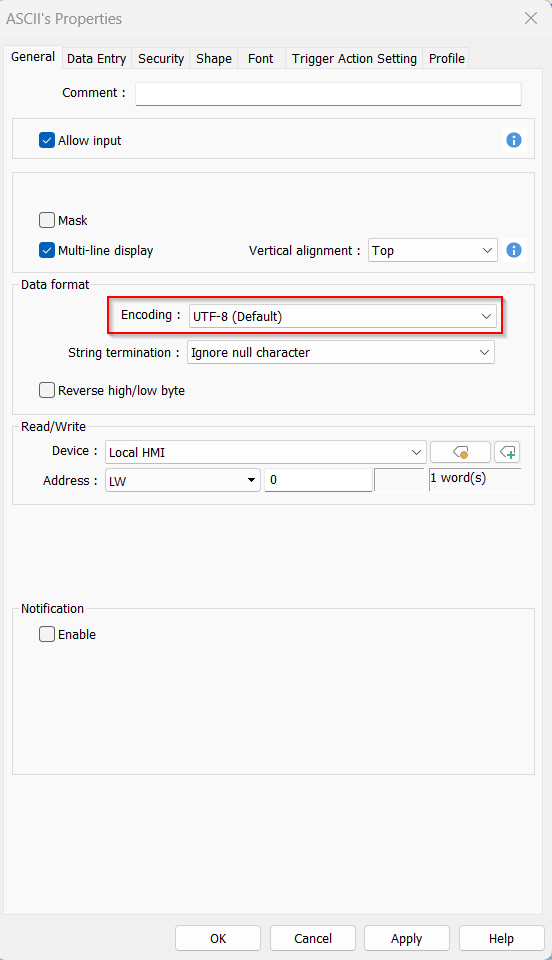
The Encoding data format within the ASCII object needs to be set to UTF-8. This ensures that the text within the object remains unchanged during data transfer to USB. Place the object within your project after applying modification to the ASCII object.
-
Lastly, create the specified files on your PC as referenced in the JS object. In this example, I have created the test2.txt file within the usb1 folder. The file path may vary slightly depending on where the EasyBuilder Pro application was initially downloaded.


const file = cstdio.fopen('usb1', '/test2.txt', 'a+'); // This is the line that decides which file to open and send the message to.
-
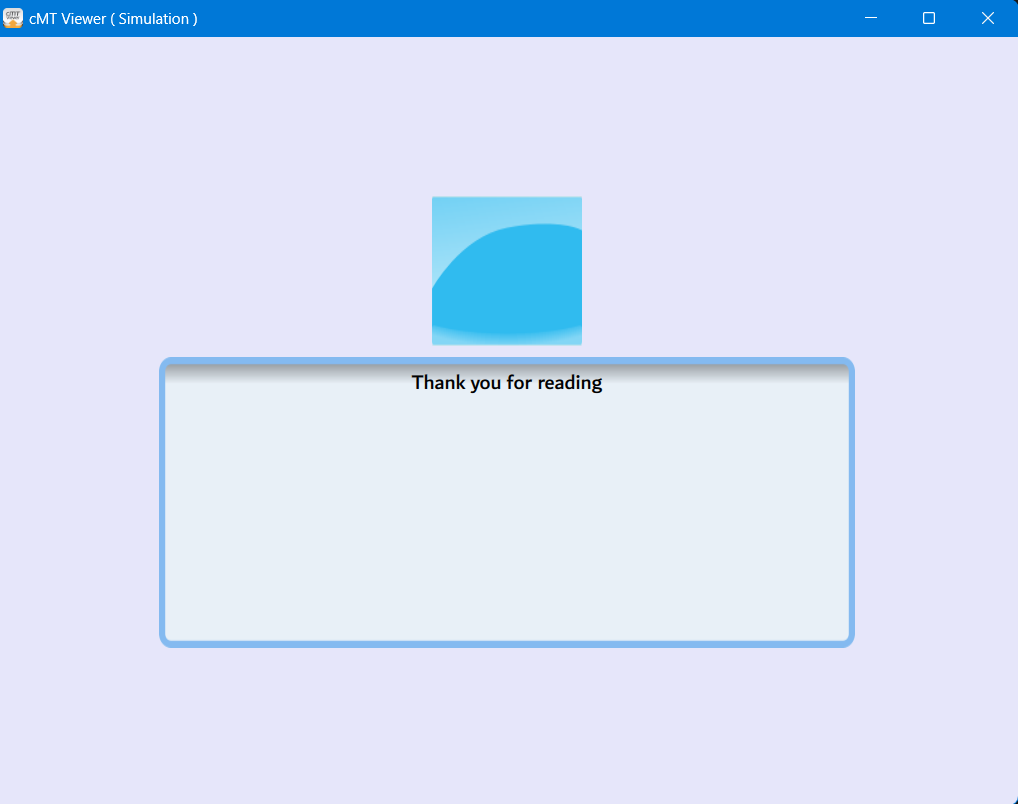
To run project navigate tot he Project tab and select Offline Simulation
-
After selecting the JS object the message within the ASCII object will be transferred to the text file.

Full Code:
const cstdio = await import('@weintek/libc/stdio');
var utf8decoder = new TextDecoder();

var mouseArea = new MouseArea();
this.widget.add(mouseArea);

var canvas = new Canvas();

this.widget.add(canvas);


mouseArea.on('click', (mouseEvent) => {

    driver.getData(this.config.StringOut, 11, (err, data) => {
    if (err) {
        console.log('Error:', err.message);
    } else {

        var bufferAsUint8Array = new Uint8Array(data.buffer);
        var message =  utf8decoder.decode(bufferAsUint8Array);
        console.log("string:", message);


        const encoder = new TextEncoder();
        const file = cstdio.fopen('usb1', '/test2.txt', 'a+');

        cstdio.fwrite(file, encoder.encode(message).buffer);


        cstdio.fclose(file);

    }

    });


});
Read From Text File
In this section, we’ll learn how to read from a text file and place the retrieved text into an ASCII object. We will use the Write JS Object created in the previous step and add a Read JS Object within the same project.
- From the Project tab, create another JS Object that will handle reading from the text file.
- Within the Config tab of the JS object we will connect the JS object to the same StringOut ASCII object as in the Write JS Object.
- In the Source Code tab, we’ll make changes to the code used in the Write JS Object. All changes will happen within the
mouseAreaclick function. For more information on setting upmouseArea, refer to the write section above.
- Inside the
mouseAreaelement, we listen for a"click"event. When clicked, it will execute the function inside the block.


mouseArea.on('click', (mouseEvent) => {
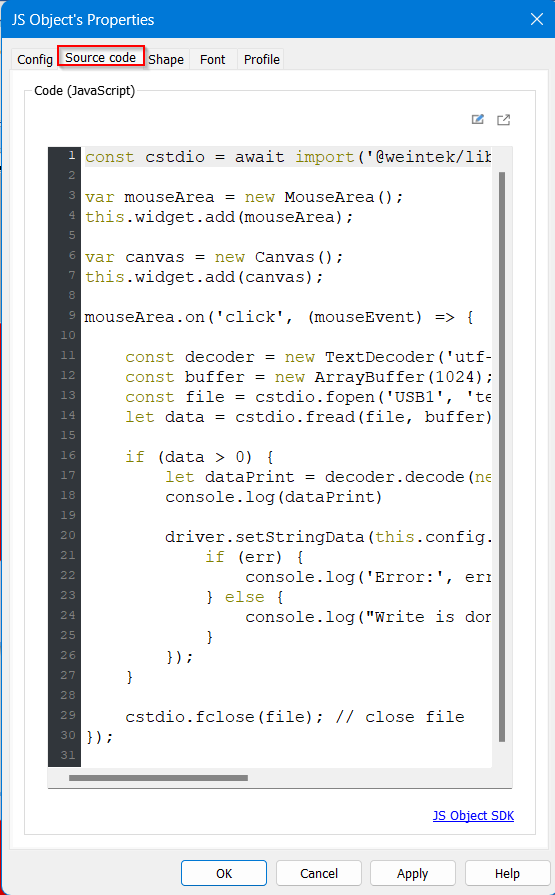
- Next, we set up the TextDecoder object and an ArrayBuffer. The
decoderensures that the string being read is properly decoded using UTF-8 to match our ASCII object format. Thebufferholds up to 1024 bytes of memory for reading the file contents.
    const decoder = new TextDecoder('utf-8', { fatal: true });

    const buffer = new ArrayBuffer(1024);
- Using
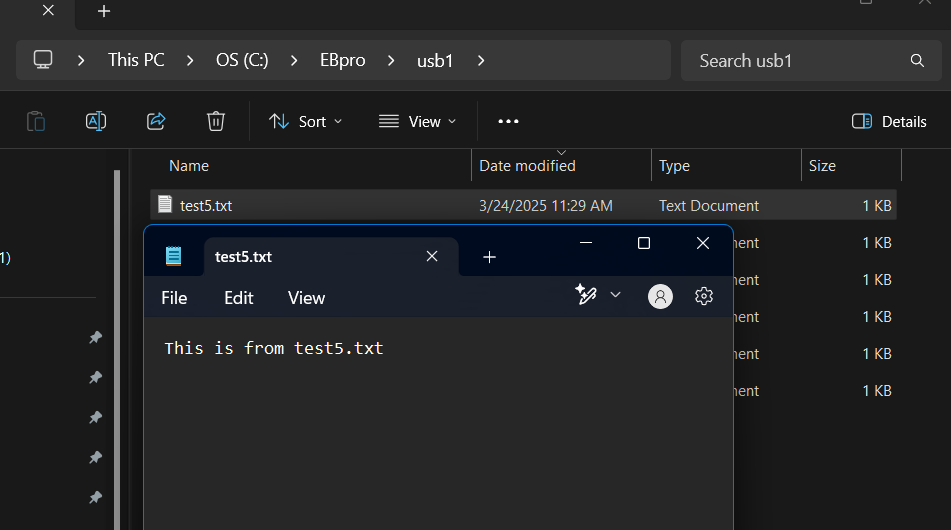
cstdio, we open and read the file. Thefopen()function takes three arguments: the disk (USB1), the filename (test5.txt), and the mode ('r'for read). This returns a file stream. We then usecstdio.fread()to read the file stream into our buffer. The variabledatastores the number of bytes actually read.
    const file = cstdio.fopen('USB1', 'test5.txt', 'r');
    let data = cstdio.fread(file, buffer);
- If some data was read (
data > 0), we decode the buffer using ourdecoder. We wrap the buffer in anInt8Arrayso that the decoder can process the bytes. The result is stored as a UTF-8 string indataPrint.
 if (data > 0) {
        let dataPrint = decoder.decode(new Int8Array(buffer, 0, data));
        console.log(dataPrint)
    }
- Still inside the
ifblock, we usedriver.setStringData()to send the decoded string to the ASCII object. Here’s how the parameters work:
this.config.StringOut– the target memory addressdataPrint.length– the length of the stringdataPrint– the actual string- A callback function to log either success or any errors that occur
        driver.setStringData(this.config.StringOut, dataPrint.length, dataPrint, (err) => {
            if (err) {
                console.log('Error:', err.message);
            } else {
                console.log("Write is done");
            }
        });
- Outside the
ifblock, usecstdio.fclose()to close the file. This prevents memory leaks and ensures good file handling. After that, hit Apply in the bottom right, place your JS Object into your project, and run a simulation.
    }
    cstdio.fclose(file); // close file
});
- Now in your simulation, you can pull and push text from
test5.txton theUSB1directory of your EasyBuilder Pro folder.
Full Code for Read Text File
const cstdio = await import('@weintek/libc/stdio'); // Library needed

var mouseArea = new MouseArea();
this.widget.add(mouseArea);

var canvas = new Canvas();
this.widget.add(canvas);

// when clicked on the inner commands will run.
mouseArea.on('click', (mouseEvent) => {

    const decoder = new TextDecoder('utf-8', { fatal: true }); // ensures object is in utf-8 for the ASCII object.
    const buffer = new ArrayBuffer(1024); // array to hold string
// open and read the test5.txt file
    const file = cstdio.fopen('USB1', 'test5.txt', 'r');
    let data = cstdio.fread(file, buffer);  // save the file into a buffer array.
    if (data > 0) {
// ensures the data is in the correct format.
        let dataPrint = decoder.decode(new Int8Array(buffer, 0, data));
        console.log(dataPrint)
// place the encoded string into StringOut memory address.
        driver.setStringData(this.config.StringOut, dataPrint.length, dataPrint, (err) => {
// catch any errors.

            if (err) {
                console.log('Error:', err.message);
            } else {
                console.log("Write is done");
            }
        });
    }

    cstdio.fclose(file); // close file
});
Full Code for Writing to Text file
const cstdio = await import('@weintek/libc/stdio');
var utf8decoder = new TextDecoder();
var mouseArea = new MouseArea();
this.widget.add(mouseArea);
const CanvasLog = require('/Logger/canvas-log-0.0.1.js');
var canvas = new Canvas();
var logger = new CanvasLog(canvas, {fillStyle: "black"});
this.widget.add(canvas);
window.logger = logger;
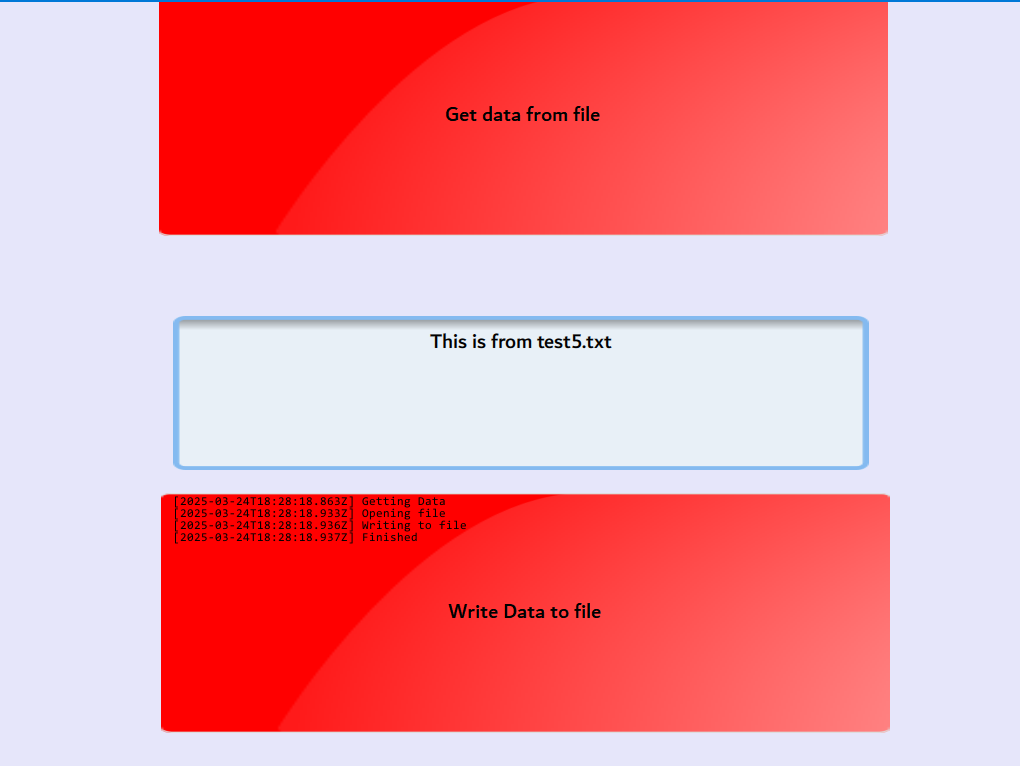
mouseArea.on('click', (mouseEvent) => {
driver.getData(this.config.StringOut, 400, (err, data) => {
if (err) {
console.log('Error:', err.message);
logger.log("Error.");
} else {
logger.log("Getting Data")
var bufferAsUint8Array = new Uint8Array(data.buffer);
var message = utf8decoder.decode(bufferAsUint8Array);
console.log("string:", message);
const encoder = new TextEncoder();
const file = cstdio.fopen('usb1', '/test5.txt', 'w+');
logger.log("Opening file")
cstdio.fwrite(file, encoder.encode(message).buffer);
logger.log("Writing to file")
cstdio.fclose(file);
logger.log("Finished")
}
});
});
Note
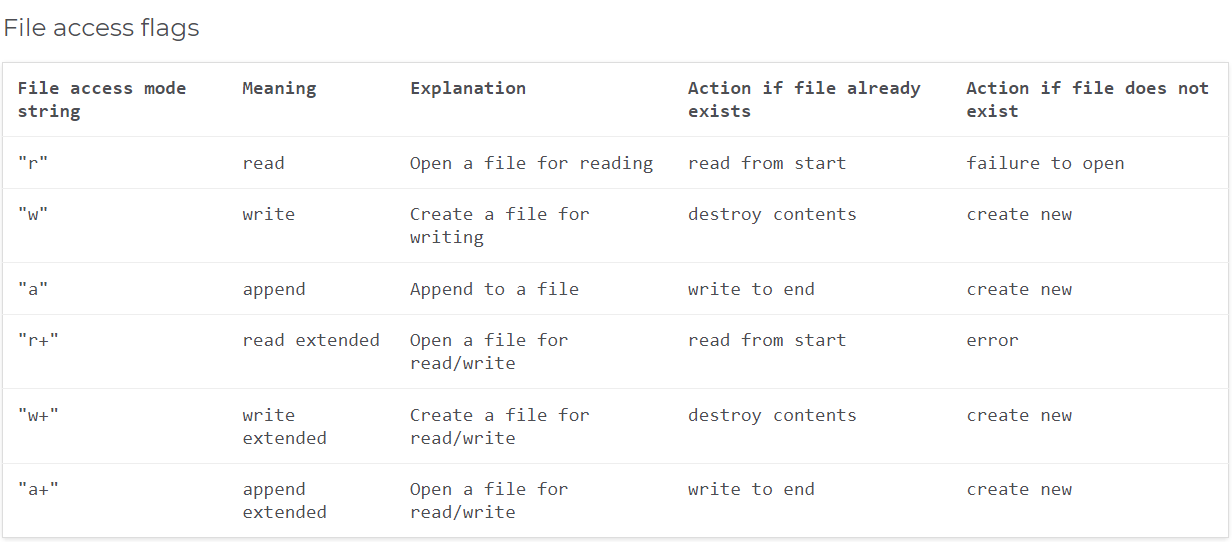
To change the file access mode modify the encoder of the JS script. For example within this example “a+” was used or the file needed to be made within the USB 1 file, but if changed to “W+” a new file will be written.
const encoder io.fopen('usb1', '/test2.txt', 'a+');